Show Artist & Song Metadata Using Airplay on Raspberry Pi

Configuring a Raspberry Pi so you can stream Airplay to it is remarkably simple. But what if you want to see what’s playing right now? The current artist and song information is sent over Airplay, and in this tutorial you’ll learn how to extract it and send it to a display on the Raspberry Pi.
My previous post on configuring Airplay on the Raspberry Pi proved very popular – I’d like the thank everyone for all the positive feedback! If you read it, you may now have a black box that can stream music from an iPhone to your Hifi.
This follow-up tutorial shows you how you can build on that. You’ll learn how to extract the currently playing artist, album and song information from the Airplay stream, decode it and show it in a user-friendly way on a display.
Before You Start
This tutorial assumes you’re already running shairport-sync on a Rapsberry Pi. To find out how to do that, follow the steps in this tutorial.
Enable Airplay Metadata
If you followed the instructions exactly, you will have built shairport-sync with the --with-metadata option.
The option enabled metadata in the code, but that didn’t really do anything by itself, because by default metadata is disabled in the config file.
You now need to edit the shairport-sync.conf file:-
sudo nano /usr/local/etc/shairport-sync.conf
Now search for metadata entry. It should look like this:-
// How to deal with metadata, including artwork
metadata =
{
// enabled = "no"; // set this to yes to get Shairport Sync to solicit metadata from the source and to pass it on via a pipe
// include_cover_art = "no"; // set to "yes" to get Shairport Sync to solicit cover art from the source and pass it via the pipe. You must also set "enabled" to "yes".
// pipe_name = "/tmp/shairport-sync-metadata";
// pipe_timeout = 5000; // wait for this number of milliseconds for a blocked pipe to unblock before giving up
// socket_address = "226.0.0.1"; // if set to a host name or IP address, UDP packets containing metadata will be sent to this address. May be a multicast address. "socket-port" must be non-zero and "enabled" must be set to yes"
// socket_port = 5555; // if socket_address is set, the port to send UDP packets to
// socket_msglength = 65000; // the maximum packet size for any UDP metadata. This will be clipped to be between 500 or 65000. The default is 500.
};
As you can see, the content is all commented out, which disables everything.
First of all, uncomment it all and change the enabled field to "yes".
// How to deal with metadata, including artwork
metadata =
{
    enabled = "yes"; // set this to yes to get Shairport Sync to solicit metadata from the source and to pass it on via a pipe
    include_cover_art = "no"; // set to "yes" to get Shairport Sync to solicit cover art from the source and pass it via the pipe. You must also set "enabled" to "yes".
    pipe_name = "/tmp/shairport-sync-metadata";
    pipe_timeout = 5000; // wait for this number of milliseconds for a blocked pipe to unblock before giving up
    socket_address = "226.0.0.1"; // if set to a host name or IP address, UDP packets containing metadata will be sent to this address. May be a multicast address. "socket-port" must be non-zero and "enabled" must be set to yes"
    socket_port = 5555; // if socket_address is set, the port to send UDP packets to
    socket_msglength = 65000; // the maximum packet size for any UDP metadata. This will be clipped to be between 500 or 65000. The default is 500.
};
You’ve now enabled the metadata streaming.
Now if you restart the service:-
sudo systemctl restart shairport-sync
When you start playing something via Airplay now, the metadata will be sent through a Unix pipe. Pipes allow programs to communicate with each other asynchronously. They’re similar to network sockets, but much easier to use. They also have the advantage of looking just like files.
The pipe_name mentioned in the shairport-sync.conf file above happens to be /tmp/shairport-sync-metadata, so you can dump the contents of the pipe just like a file:-
cat /tmp/shairport-sync-metadata
This should display raw data every time you change track. Because it’s a pipe rather than a regular file, the cat command will not terminate because it doesn’t see and “end of file” indication. It simply waits for more data.
It displays the raw XML data received from the Airplay device which will look something like this:-
<item><type>73736e63</type><code>666c7372</code><length>10</length>
<data encoding="base64">
MjEzNTk4NDM5Mw==</data></item>
<item><type>73736e63</type><code>70666c73</code><length>0</length></item>
<item><type>73736e63</type><code>666c7372</code><length>10</length>
<data encoding="base64">
MjEzNTk4NTcxNg==</data></item>
<item><type>73736e63</type><code>70666672</code><length>0</length></item>
...
Now that proves you’re receiving information from the Airplay client, but it’s not very user friendly.
The artist, album and track names are encoded in base64 format which enables them to be sent safely inside XML. You need to decode the base64 back into Unicode to make it human-readable. You also have to understand the XML schema in use, which involves lots of magic code numbers.
Decode the Airplay Metadata
Luckily Mike Brady, developer of the excellent shairport-sync, has also made a decoder available, which is going to make this job very easy indeed.
First, clone the repo into as subdirectory of your home directory:-
cd ~
git clone https://github.com/mikebrady/shairport-sync-metadata-reader.git
Then configure and build it:-
autoreconf -i -f
./configure
make
sudo make install
What you have done here is built a program called shairport-sync-metadata-reader. Now you’re ready to decode the metadata.
At this point you might need to need to restart the Airplay link, and to be on the safe said, restart the server too:-
sudo systemctl restart shairport-sync
Then if you’re already Airplaying, disconnect from the Raspberry Pi and reconnect. If you don’t do this the metadata might not be decoded properly.
Now check the metadata decodes correctly by sending the output of the pipe into theshairport-sync-metadata-reader you just built:-
shairport-sync-metadata-reader < /tmp/shairport-sync-metadata
Once you’re reconnected to the Raspberry Pi, start playing again. Skip some tracks to prompt Airplay to send some metadata.
At this point you should see something useful, such as:-
"ssnc" "snua": "AirPlay/353.10.2".
"ssnc" "acre": "1654417222".
"ssnc" "daid": "4C5F9ADF47EF8B2F".
Client's IP: "fdaa:bbcc:ddee:0:7cb4:24c1:3ebb:22b9".
"ssnc" "svip": "fdaa:bbcc:ddee:0:a885:f262:7318:a8a8".
"ssnc" "pbeg": "".
"ssnc" "pvol": "-8.35,-13.40,-96.30,0.00".
"ssnc" "flsr": "29978419".
"ssnc" "pvol": "-8.35,-13.40,-96.30,0.00".
"ssnc" "pffr": "".
"ssnc" "flsr": "29979572".
"ssnc" "pfls": "".
"ssnc" "pffr": "".
"ssnc" "mdst": "29988141".
Persistent ID: "2081858201".
Album Name: "OK Computer".
Artist: "Radiohead".
Composer: "Colin Greenwood/Ed O'Brien/Jonny Greenwood/Phil Selway/Thom Yorke".
Genre: "Rock".
Title: "Paranoid Android".
"ssnc" "mden": "29988141".
"ssnc" "prgr": "29979009/29988141/46890300".
"ssnc" "prsm": "".
"ssnc" "dapo": "57964".
Woohoo! There you have it, Album Name, Artist, Composer, Genre and Title fields are all filled in.
That’s great, but dumping text to a terminal is hardly the best user interface. Time to do something useful with all that lovely data…
Connecting a Display
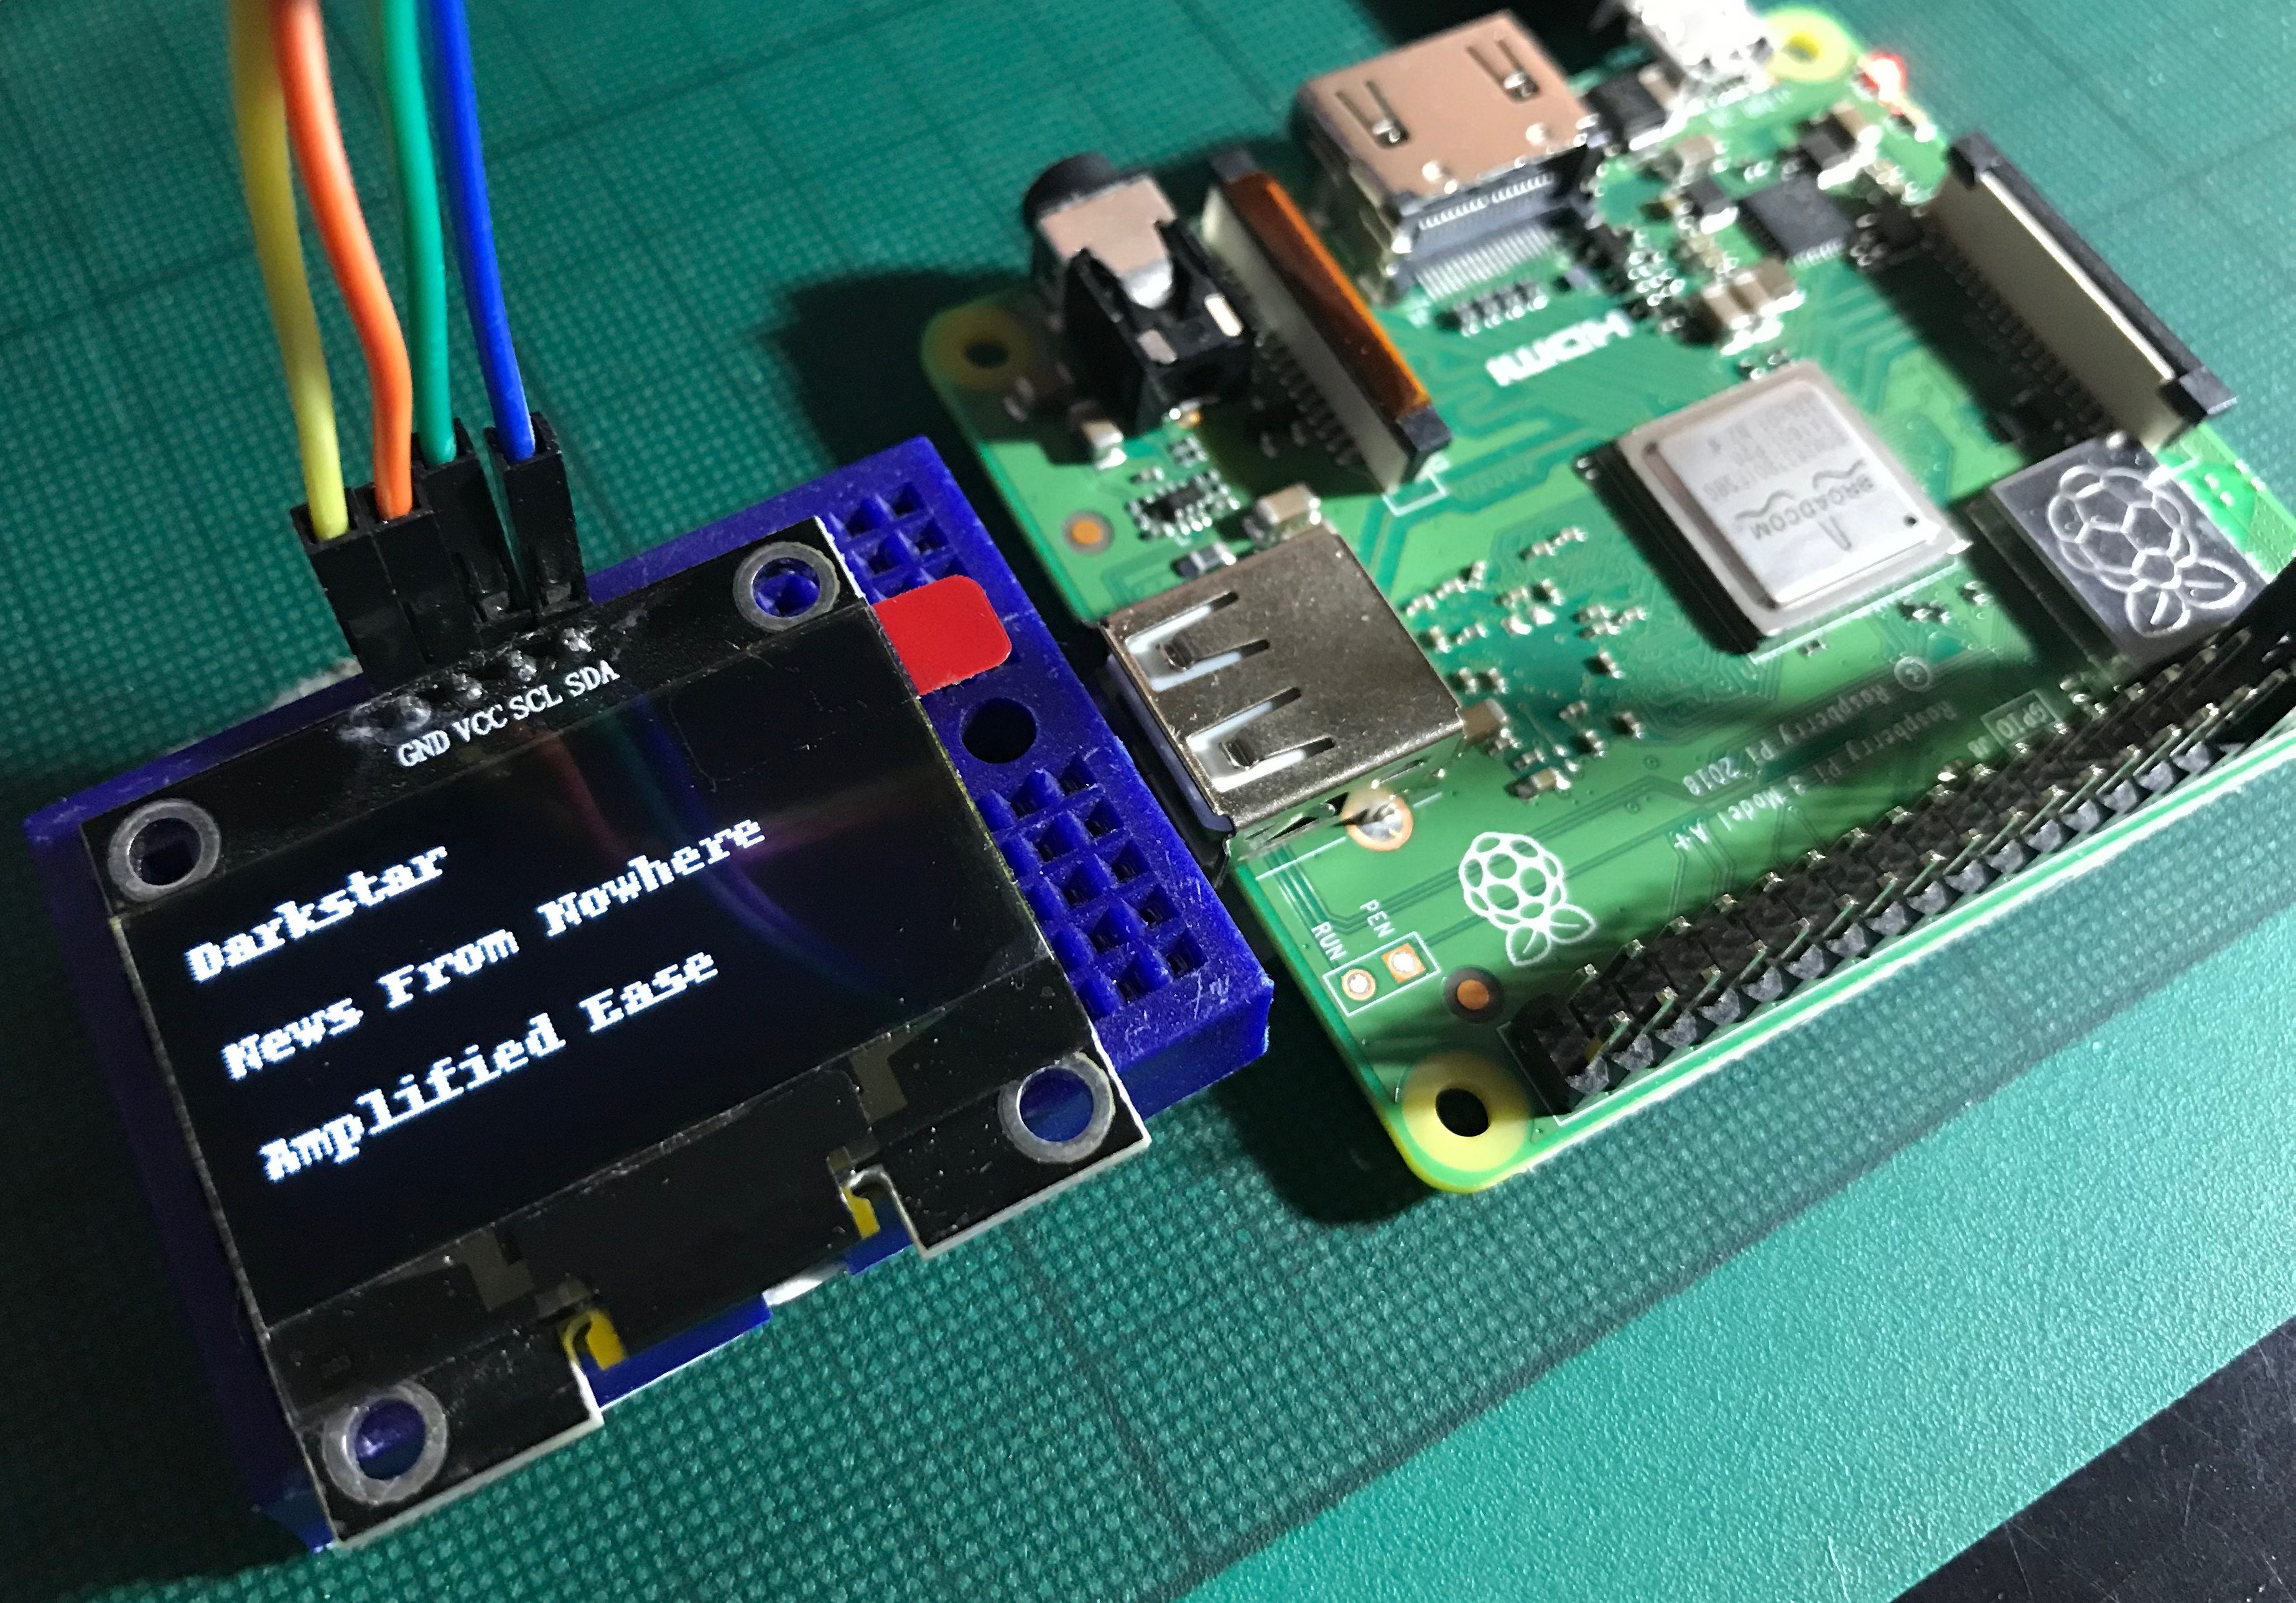
There are seemingly endless options for connecting a display to the Raspberry Pi, but this was a weekend project and I was constrained by what I had lying around that would work directly with 3.3V. The answer was a 1.3″ OLED SH1106-based display with an I2C interface. The suppliers change regularly, but you can find similar displays such as a this MakerHawk SSD1327-based version on Amazon. These are cheap, easy to find online
, and simple to wire up.
Wiring Up the SH1106 Display
This is the easiest part. As a prototype you can do it all using jumper leads, because both the display and the Raspberry Pi have IDC connectors for all the signals you need.
Power everything down and then connect as shown below:-
| Raspberry Pi (40-pin) | SH1106 |
|---|---|
| Pin 6: GND | GND |
| Pin 1: 3V3 | Vcc |
| Pin 5: SCL | SCL |
| Pin 3: SDA | SDA |
Configure the I2C Interface
First off you need to configure I2C support. Enable the I2C interface by turning it on in raspi-config:-
sudo raspi-config
Select option 5: Interfacing Options followed by option P5: I2C, and select <Yes> to enable I2C.
If you’re asked to reboot, do it now.
Install I2C Dev Tools
sudo apt-get install libi2c-dev i2c-tools
Now check an I2C interface is present:-
ls /dev/i2c*
Unless you’re using a very old model, you’ll most likely see the following response:-
/dev/i2c-1
This is the user-mode I2C interface, I2C-1, that you’ll use to connect to the display. (I2C-0 is reserved for system use these days.)
Check Whether the Display is Present
Ensure the display is wired up as instructed above, and issue the following command:-
sudo i2cdetect 1
This will give a scary warning like this:-
WARNING! This program can confuse your I2C bus, cause data loss and worse!
I will probe file /dev/i2c-1.
I will probe address range 0x03-0x77.
Continue? [Y/n] Y
This seems unnecessary – you’re not running Windows here! Input Y to continue and if your display is connected up properly you should see the a response like this:-
     0  1  2  3  4  5  6  7  8  9  a  b  c  d  e  f
00:          -- -- -- -- -- -- -- -- -- -- -- -- --
10: -- -- -- -- -- -- -- -- -- -- -- -- -- -- -- --
20: -- -- -- -- -- -- -- -- -- -- -- -- -- -- -- --
30: -- -- -- -- -- -- -- -- -- -- -- -- 3c -- -- --
40: -- -- -- -- -- -- -- -- -- -- -- -- -- -- -- --
50: -- -- -- -- -- -- -- -- -- -- -- -- -- -- -- --
60: -- -- -- -- -- -- -- -- -- -- -- -- -- -- -- --
70: -- -- -- -- -- -- -- --
This signifies that a device with I2C address 78 has been found on the I2C-1 bus. The reason is says 3C is that the lowest bit of the I2C address is actually a read/write bit and the address is in bits 7..1. In some tools and documentation the address is sometimes shifted right by 1 bit to remove the R/W bit. This shift right by one bit is equivalent to division by two.
Your display might have a different address. Whatever, it should be be found by i2cdetect since it scans the entire address range.
Installing a Python Library for the SH1106 Display
Once your I2C device is found it’s time to talk to it!
The simplest way is to install Richard Hull‘s excellent luma.oled package for Python. The github repo contains heaps of examples, but you can install ready-built libraries easily:-
sudo apt-get install python-dev python-pip libfreetype6-dev libjpeg-dev build-essential
sudo -H pip install --upgrade luma.oled
Assuming that goes painlessly, you’re ready to write some code…
Write the Code
For the sake of simplicity, I’ve written all the code in a single file. There are two main parts:-
- Extract the metadata we want from the input stream
- Render the extracted metadata to the display
Create a new file for the code:-
cd ~
mkdir metadata-display
cd airplay-meta
nano consume-metadata.py
Next, copy the following code into the file.
#!/usr/bin/env python
import sys
import re
from luma.core.interface.serial import i2c, spi
from luma.core.render import canvas
from luma.oled.device import sh1106

artist = ""
track = ""
album = ""

def extract(line):
    m = re.match('^(Title|Artist|Album Name): \"(.*?)\"\.$', line)
    if m:
        return m.group(1), m.group(2)
    else:
        return None, None

def update(key, val):
    global artist, album, track
    if key == "Artist":
        artist = val
    elif key == "Album Name":
        album = val
    elif key == "Title":
         track = val

def render(device):
    with canvas(device) as draw:
        draw.text((0, 0), artist, fill="white", align="center")
        draw.text((0, 20), album, fill="white", align="center")
        draw.text((0, 40), track, fill="white", align="center")

# Create devices
serial = i2c(port=1, address=0x3C)
device = sh1106(serial)

# Welcome message
with canvas(device) as draw:
    draw.rectangle(device.bounding_box, outline="white", fill="black")
    draw.text((30, 20), "Ready...", fill="white")

# Main loop
try:
    while True:
        line = sys.stdin.readline()
        key, val = extract(line)
        if key and val:
            update(key, val)
            render(device)

except KeyboardInterrupt:
    sys.stdout.flush()
    pass
Save the file.
Before trying to run the code, you need to make the Python program file executable:-
chmod 755 consume-metadata.py
The code is designed to run forever, and it is invoked with an input pipe directly from output of the metadata decoder. The Airplay metadata decoder can be used like this:-
cat /tmp/shairport-sync-metadata | shairport-sync-metadata-reader
This takes the output of a Unix pipe and filters it through the metadata decoder. Now you need to pipe the output of the decoder into a program to write it to the display.
There are various ways you could construct this on the command line, but for ease of reading I prefer to do it like this:-
cat /tmp/shairport-sync-metadata | shairport-sync-metadata-reader | ./consume-metadata.py
This command “reads” correctly, starting with dumping the raw Airplay data from the Unix pipe, sending it into the metadata decoder, and piping the decoded output of that into the display program.
You should now see the current track information displayed on the OLED display.
Create a Shell Script
In the same directory, open a new file called display-metadata:-
nano display-metadata
And edit it so it contains:-
#!/bin/bash
cat /tmp/shairport-sync-metadata | shairport-sync-metadata-reader | /home/pi/airplay-meta/consume-metadata.py
Note that the full path of the Python script is included: /home/pi/airplay-meta/consume-metadata.py. This is because the script will be called from systemd so all paths should be absolute.
Close this file and give it execute permission:-
chmod 755 display-metadata
Next, copy the script you just created to the /usr/local/bin directory:-
sudo cp display-metadata /usr/local/bin
This is now a quick and easy way to launch the metadata display program.
As a sanity check, you can now leave the current working directory and run the script by name only to make sure it’s found by the shell:-
cd ~
display-metadata
You should see “Ready…” on the OLED screen. Press ctrl-c to cancel.
Create an Automatic Service
Running a headless-mode Raspberry Pi is great for embedded devices, but it does have the added overhead that you need to configure your code to start automatically. The modern way to do this is using systemd and luckily it’s not very hard.
To create the systemd service, first create a new service definition file:-
sudo nano /lib/systemd/system/display-metadata.service
In the editor, enter the following lines:-
[Unit]
Description=Airplay Metadata Display
After=shairport-sync.target network-online.target multi-user.target

[Service]
ExecStart=/usr/local/bin/display-metadata
Restart=on-failure

[Install]
WantedBy=multi-user.target
This defines a new systemd service with the following properties:-
- it’s called
display-metadata - it starts after the
shairport-syncservice and the rest of the system is up and running - it starts by invoking the
display-metadatascript in the/usr/local/bin/directory.
The rest of it is boilerplate you don’t need to worry about.
Now that you’d added a new service, you need to tell systemd to reload its services so it finds it:-
sudo systemctl daemon-reload
This will complete silently, but it’s hopefully found your now service, so when you start it with:-
sudo systemctl start display-metadata
you should see the OLED display light up again, and the metadata service should run successfully from now on!
Now enable it at boot time:-
sudo systemctl enable display-metadata
The service should now start automatically on reboot.
Thanks for Reading & Get In Touch
Well done for making it this far! I hope this was helpful to you.
Did you do something great with this? I’d love to see your photos and hear your stories. Please send me feedback, either by leaving a comment below or by contacting me directly.
And if you’d like to receive updates about my upcoming projects, please join my mailing list.
You can also follow me on Twitter.