Unleash Your Raspberry Pi! How to Install Headless Raspbian Lite

Need to free your Raspberry Pi from the desk? Unleash it from monitor and keyboard? Learn how to build a minimal installation of Raspbian Lite running in headless mode so you can install it in a robot… or up a tree!
These days it’s actually very easy to set up such a system, using Raspbian Lite and the NOOBS installer. This guide will show you how.
What is Headless Mode?
Some of the coolest uses for a Raspberry Pi involve embedding it inside another device. Such a setup is known as an embedded system because the processor is embedded within a larger system that might not obviously be a computer. A classic example of an embedded system is a washing machine, which would typically have a small, cheap microcontroller at its heart.
Washing machines aren’t too exciting, but these days it’s relatively easy to build a dedicated media player, a retro games console or even a robot.
Many of these applications would benefit from choosing a Raspberry Pi over a microcontroller-based system, notably the CPU power, the on-board networking and the large memory and storage. But because it’s a computer rather than a dedicated microcontroller, you need to configure the Pi properly to run in such a way.
For an embedded system you should look for a barebones OS. You would generally run it in what’s called headless mode, which means there is no monitor, keyboard or mouse. Its day-to-day operation will be to run preconfigured programs, interacting via attached peripherals, which could include serial ports, network or wireless links, keypads, push buttons, touch screens, environmental sensors, and so on.
A headless system still allows administrative access so you can change settings, add or remove programs, and even edit and recompile code natively on the target device.
It does this using an SSH (or secure shell) connection to a terminal session, either on a local LAN or remotely via the internet. Once connected via an SSH session, you can do almost anything you could directly with a physical keyboard.
Headless systems have no need for lots of graphical applications, or even a GUI at all, since there will be no monitor, keyboard or mouse. What’s more, for glitch-free operation you want as few processes running as possible. This is to leave as much CPU and RAM as possible for your embedded application.
Step-By-Step Installation
Below is the installation procedure.
You will need the following:-
- A Raspberry Pi – here’s a Complete Starter Kit
- A computer with internet connection and some way of writing to an SD card. I used an old Macbook Pro, but Linux or even Windows will do
- A monitor, and a wired USB keyboard, preferably with an integrated mouse
to save USB ports. This is only until you get the headless mode running.
- Ethernet or wifi connection on the same LAN as your computer, with fast connection to the internet
- A class 10 microSD card with an adapter
to allow your computer can write to it
This procedure works for Raspberry Pi 3 (including the Model A+), and should also work for earlier versions, except the original (non-wifi) Pi Zero. There’s more information on doing this on a Pi Zero here.
Format a MicroSD Card
The Raspberry Pi was always quite fussy about what SD cards it would work with, but these days you shouldn’t find too many problems. A Class 10 or U1 microSD card that supports a minimum transfer speed of 10MB/s should be fine.
In terms of capacity, for Raspbian Lite a 4GB card will be perfectly adequate, if you can still find one: 4GB cards are actually pretty rare nowadays. You may well end up using something bigger, which is fine, but things will get difficult if you go above 32GB because you’ll have to partition the card for the initial installation.
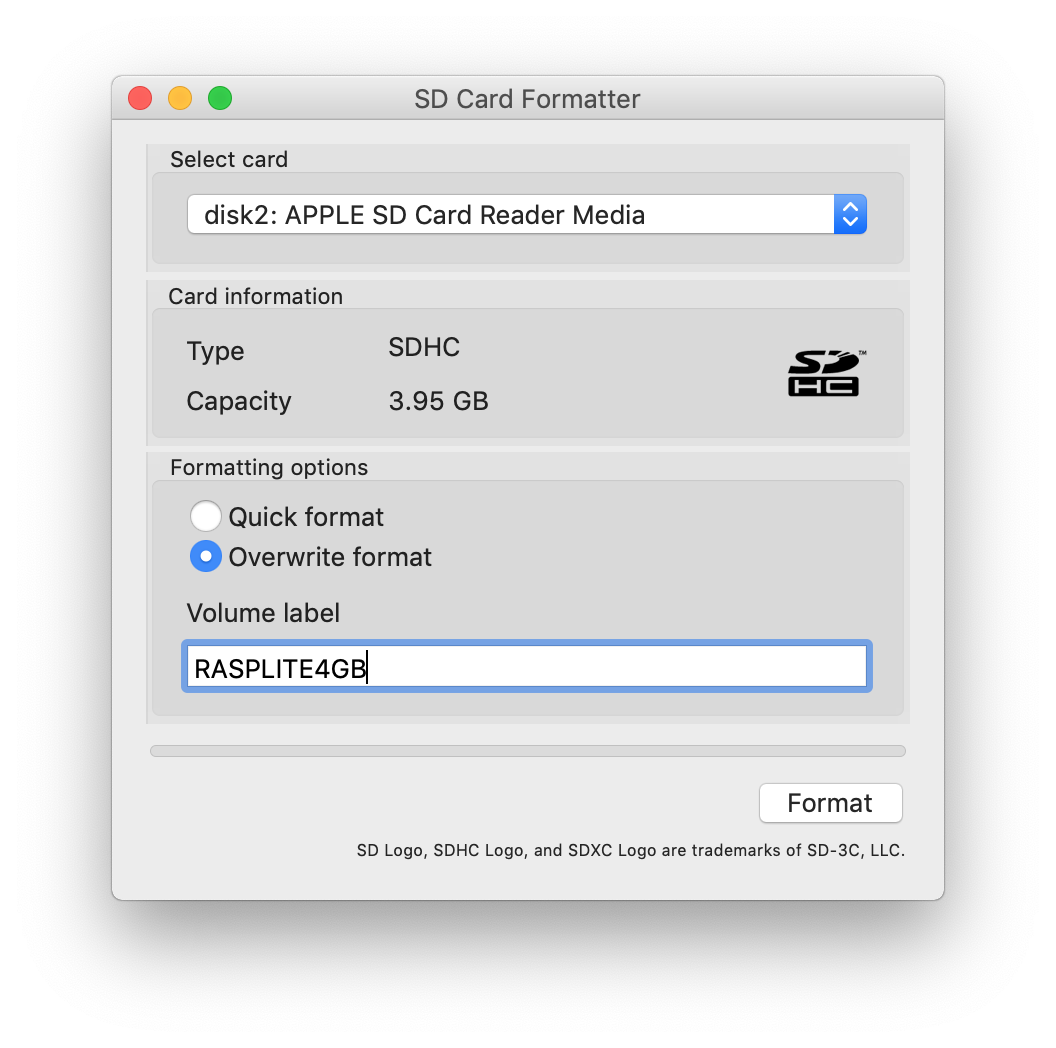
You can format the card from the command line but the details can be a little tricky on some systems, and it’s always a bit scary that you might accidentally format your hard drive! So instead, download the SD Card Formatter utility to make your life easier.
Put the card into an adapter and insert into your computer. Launch the SD Card Formatter program and ensure the correct card is selected. Check “Overwrite format” to perform a full format, and set the “Volume Label” to a meaningful name (although it can only be very short). Click “Format” and go get a coffee or tea: this could take a while, depending on the size of your SD card.
Choosing the Operating System
Once your card is formatted you’re ready to install your operating system.
Even among the more minimal distributions, there is now a surprisingly large number of options to choose from on the Raspberry Pi platform. This is a good thing and a bad thing. Good because when you’re an expert with specific needs you can choose what you want. Bad because if you’re a beginner you get confused by too much choice.
You decision is actually made easier by the fact that some of the barebones OSes, such as Arch Linux, are are aimed at people with quite a lot of Linux knowledge. They’re quite cutting edge and you’re more likely to run into issues when installing third party applications and libraries.
So unless you’re an expert user, I always recommend choosing Raspbian Lite. It is mature because it’s derived from the original Raspbian OS, but it has had the GUI and most of the applications removed to save resources. It’s entirely command-line driven, and can easily configured to run in headless mode. What’s more, it can be installed using NOOBS.
Install NOOBS
What’s NOOBS? It stands for “New Out Of the Box Software,” which is a good effort at a backronym. But the jokey name aside, it’s definitely the easiest way to install an OS on Raspberry Pi.
First of all, get a copy of NOOBS by downloading from here.
There are two variants of NOOBS, the full and lite versions. The difference is that the full version comes bundled with a full version of Raspbian and some other OSes. The Lite version comes with nothing bundled. Since you’re installing Raspbian Lite, there’s no reason to download the full version since it’s not bundled with the full version and you’d still have to download the binary anyway, so it makes sense just to choose the NOOBS Lite version.
The only time this might cause a problem is if your Raspberry Pi will not have network access, for instance if it’s a Zero or it’s going to be offline or on a 3G connection when you do the installation. But for normal operation I’ll assume your Pi will have a network available.
Locate the ZIP file for NOOBS_lite_v3_0 (or whatever the latest version is) in your download folder and extract it to a folder. Then select all the files inside the extracted folder and copy them to the SD card.
Occasionally (on macOS at least) you might find the SD card has disappeared from Finder after formatting. Simply pull it out it and plug it back in, and it should reappear.
Now copy all the files you selected in the NOOBS folder to the card. It’s perfectly fine to drag and drop in your computer’s file explorer (Finder, Windows Explorer, etc): there’s no need to use the command line.
Once the files are on the card, eject the card properly before pulling it out (this ensures all the files get written properly).
Launch NOOBS on Raspberry Pi
Next, ensure your Raspberry Pi is unplugged from any power supply. Insert the SD card into the card slot, connect the Pi to a monitor and keyboard (and a mouse if possible). Then power it up. You should see the NOOBS installation screen appear.
If your Pi is on a wired ethernet connection then you should go straight to the OS chooser screen, which will populate with optional OSes to install.
If you’re using Wifi then you’ll see a message like this when you boot the Raspberry Pi:-
Network access is required to use NOOBS without local images. Please select your wifi network in the next screen.
This is because NOOBS Lite needs the network to list the available OS “images” (or binary programs), and it doesn’t yet have the credentials to join your wifi network. Go ahead and choose a network and give it the password.
Note that you shouldn’t technically need a mouse for any of this, because you should be able to navigate everything using the keyboard, but there are a couple of gotchas in the Wifi network dialog box that will limit the network you can join unless you attach a mouse to drive the UI fully.
Assuming you’re downloading Raspbian Lite then it’s just under 1GB and will take a little while to download, extract and install. But the process should be smooth and painless.
Login for the First Time
Once installed, leave the keyboard and monitor connected (you can lose the mouse now). Restart the Pi and it should boot right into Raspbian Lite. There is no GUI, it will drop straight into a shell login, and if you press any key you’ll be presented with:-
Raspbian GNU/Linux 9 raspberrypi tty1

raspberrypi login:
Type the username “pi” and when prompted for the password type “raspberry”.
Now you can run the following command:-
sudo raspi-config
This launches a text-based menu system to allow you to configure your system easily. The sudo part means “run as root”, which is a very common operation when configuring barebones systems like this, since you need root (aka administrator) privileges to modify drivers and other low-level settings.
This is what raspi-config looks like:-

As you can see, it’s a fairly simple but effective text-menu driven system, reminiscent of Microsoft DOS. Press the up/down cursors to navigate the menu, and press <Enter> to drill down into each sub-menu. Pressing <Esc> will back you out of each sub-menu. Cursor left/right or <Tab> will select the buttons to confirm or cancel settings.
The settings you change in raspi-config will persist between reboots, so it’s used for one-off configuration rather than day-to-day operation.
Configure Headless Mode
Assuming you are planning on running your Raspberry Pi as an embedded system, you’ll now need to set it up to run in headless mode. So the first thing you need to configure is SSH access, so you can open a shell on the Raspberry Pi from a remote computer.
To enable SSH, run sudo raspi-config and choose option “5: Interfacing Options”, and in the submenu choose option “P2: SSH”. Enter the sub-option, select “Yes” and press <Enter> to confirm it. This will enable the SSH server.
When you select “Finish” you’ll drop back to the command line.
Find Your Raspberry Pi’s Local IP Address
The next thing you need is the local IP address of the Raspberry Pi. A local IP address will normally be of the form 192.168.x.x (or occasionally 10.x.x.x). If you’re planning on accessing it from outside your local network then you’ll need the WAN address, but I won’t cover that in this tutorial.
The ifconfig command gives you IP configuration information:-
$ ifconfig
Sometimes the output is a bit overwhelming, but you can filter it.
If your Pi is on a wifi, you can get the IP address of the wifi adapter using the following command:-
$ ifconfig wlan0 | grep "inet "
If you’re on a wired connection you can use:-
$ ifconfig eth0 | grep "inet "
This will give you output something like:-
inet 192.168.0.123 netmask 255.255.255.0 broadcast 192.168.0.255
The address after inet is your local IP address. Make a note of this, because you’ll need it every time you want to connect via SSH.
Connect to the Raspberry Pi Via SSH
SSH is a client program, meaning it runs on the computer connecting to the Raspberry Pi, rather than on it. It gives you shell (or terminal) connection into the Raspbian Lite OS, so you will have a fully functional command line just as if you were connected via a physical keyboard.
If you have access to a Mac or Linux machine (or even another Raspberry Pi!), then you can launch SSH just by typing ssh at the command line. If you’re on Windows, you’ll need to download an SSH client. The most popular is PuTTY.
From a computer on the same network launch an SSH client and connect to pi@<local-ip-address>. On a Mac/Linux you can do this in a Terminal window with something like:-
$ ssh pi@192.168.0.123
but of course substitute your Raspberry Pi’s actual address in there.
If this is the first time you’re connecting, the SSH client will ask you to verify the validity of the host (the Raspberry Pi).
The authenticity of host '192.168.0.123 (192.168.0.123)' can't be established.
ECDSA key fingerprint is SHA256:TKHP5juMprOxigSycoA1b5d8IpxFKkx7b7AuORd80ew.
Are you sure you want to continue connecting (yes/no)? yes
Warning: Permanently added '192.168.0.123' (ECDSA) to the list of known hosts.
Next you’ll be asked for the password:-
pi@192.168.0.123's password:
Enter the default password “raspberry”. Now you should have a remote command line into your Raspberry Pi! You can unplug your HDMI and keyboard now.
You can even run the raspi-config utility within SSH which makes remote configuration even easier.
Change the Default Password
Once you’ve finished configuring your system you should change the login password. The easiest way is using raspi-config, option 1.
People often think it’s not important because the Raspberry Pi often has nothing very important on it. But it’s not the contents of your Pi you should be concerned about, it’s the computing resource itself: your Pi could become part of a “botnet” for illegal activities.
You’re All Set!
Now your Raspberry Pi is secured and completely ready for headless operation. It’s running Raspbian Lite so it will be fast and efficient, but you can install any additional software you need.
Best of all, you can install it anywhere with network access and administer it remotely from your computer!
If you found this article useful, or you have any comments or suggestions, please contact me or leave a comment below. Sign up for the email list for occasional updates about forthcoming articles.


3 Responses