Introduction to IoT: How to Send MQTT Messages From iOS Using Swift
Mobile is the natural way to control IoT devices. But even controlling a simple on/off switch requires a fair amount of code, and it can be hard to figure out where to start. This tutorial shows you how to build a simple MQTT publisher client app using Swift on iOS.
It goes without saying that mobile and IoT should fit together seamlessly. And certainly, having an IoT device that was not accessible via smartphone would feel like a major fail.
But there are so many possible ways of integrating an app with an IoT device that it can be overwhelming deciding which to use. BLE or WiFi? Plain old HTTP/HTML, a RESTful, SOAP or GraphQL interface? What about replacing HTTP with an IoT-focussed application layer such as XMPP and MQTT?
In this IoT series I’ve been concentrating on MQTT. The reasons are straightforward: it removes the HTTP layer and the burden of dealing with heavy web-server technologies, and it brings a fresh, lightweight approach to building an ad hoc network of things.
And as it happens, there is ample support in the form of third-party iOS libraries, so implementing an MQTT client on iOS is straightforward.
Before You Start
This project will use Xcode, which is free to download. The quickest way to get started is to use the iOS simulator which is bundled with Xcode.
You’ll need to understand a little about MQTT publishers and subscribers. All the clients need a single server (called a broker in MQTT parlance) in order to pass messages between them.
It’s important that you have an MQTT server running in order to be able to complete this tutorial.
If you haven’t already then I suggest you read my earlier article on setting up a simple MQTT broker. Not only will it get you started practically, but it will also introduce you to some core MQTT concepts.
Download the Code
The best way to get started is to download the code from github:-
git clone git@github.com:leedowthwaite/LD-MQTT-iOS.git
About MQTT-Client-Framework
MQTT-Client-Framework was developed by Christoph Krey and is available on github. The easiest way to install it is using CocoaPods.
The project as hosted on github already contains the Pod for MQTTClient, so you don’t have to do anything else yet.
Adding the MQTTClient Pod Manually
If you didn’t download the github project because you’re writing the code from the ground up, or adapting an existing project, the important bit is the Podfile, which includes the important line:-
pod 'MQTTClient'
Once you’ve added this line, run:-
pod install
to install the MQTT Client Framework.
Install the MQTT Client Package
At this point, it will make your life much easier if you install the mosquitto client tools for testing. They allow you to start and stop all MQTT services from the command-line. You can mock-up any missing part of the system in an instant.
Installing mosquitto MQTT Client on macOS
Since you’re building an iOS app, I assume you’re on macOS. There’s a single mosquitto package to install everything:-
brew update
brew install mosquitto
I’ve assumed you’re already running an MQTT broker on another machine, such as a Raspberry Pi, but if you need to temporarily start one locally on the Mac, you do it using this package.
Installing mosquitto MQTT Client on Linux
If you’d prefer to test from Linux, for example from a Raspberry Pi where you might be running an MQTT broker, or if you’d like to use a virtual machine, you can install the mosquitto client code using:-
apt update
sudo apt install mosquitto-clients
If your installation doesn’t yet support apt, replace it with apt-get.
Configure the App
In Xcode, browse to the file ClientViewController.swift. Near the top you’ll see the lines:-
    let MQTT_HOST = "your-mqtt-server-hostname-or-IP-address"
    let MQTT_PORT: UInt32 = 1883
Change the first line to match your MQTT server’s hostname or IP address.
That’s the only change you need to make to the code!
How It Works
I’ll explain briefly how the app works.
The MQTT State Variables
There are two MQTT state instance variables, transport and session:-
    private var transport = MQTTCFSocketTransport()
    fileprivate var session = MQTTSession()
transport is an MQTTCFSocketTransport object that just holds the TCP/IP network configuration for connecting to the MQTT broker. The MQTTSession object, session, is the one you’ll be using to handle message events.
There’s another variable more loosely related to MQTT state, completion: it actually holds a reference to a closure (a function) which is invoked when a message has been delivered,
fileprivate var completion: (()->())?
Initialisation
The viewDidLoad method initialises the MQTT client:-
    override func viewDidLoad() {
        super.viewDidLoad()

        self.session?.delegate = self
        self.transport.host = MQTT_HOST
        self.transport.port = MQTT_PORT
        session?.transport = transport

        self.setUIStatus(for: self.session?.status ?? .created)
        session?.connect() { error in
            print("connection completed with status \(String(describing: error))")
            if error != nil {
                self.setUIStatus(for: self.session?.status ?? .created)
            } else {
                self.setUIStatus(for: self.session?.status ?? .error)
            }
        }
    }
Here’s what’s happening:-
- the
MQTTSessiondelegate is set toselffor callback handling. - the
MQTTCFSocketTransportobject is configured for connection to the MQTT broker - the
transportobject is connected to thesessionobject - Set the initial UI status
- Try to connect the
MQTTSessionto the MQTT broker
The final operation may succeed or fail, indicated by the error argument passed into the connect() completion handler. The UI is updated according to the error flag.
The UI State Variables
There are two UI state variables, button and statusLabel, which are connected to their associated objects in Main.storyboard.
    @IBOutlet private weak var button: CircularButton!
    @IBOutlet private weak var statusLabel: UILabel!
I won’t discuss the UI configuration in any depth here – the storyboard should be fairly self-evident. The only thing that might not be obvious is that the button text changes are implemented in the storyboard rather than in the code.
The button is a custom CircularButton type that is defined at the top the main view controller file for convenience. As the name suggests, it implements a circular button that turns blue when isSelected is true, and reverts to clear with a blue border when isSelected is false.
Update the UI Status
There’s not much to see here, just a centralised function to ensure the UI is updated correctly for the current MQTTSessionStatus.
    private func updateUI(for clientStatus: MQTTSessionStatus) {
        DispatchQueue.main.async {
            switch clientStatus {
                case .connected:
                    self.statusLabel.text = "Connected"
                    self.button.isSelected = true
                    self.button.isEnabled = true
                case .connecting,
                     .created:
                    self.statusLabel.text = "Trying to connect..."
                    self.button.isEnabled = false
                default:
                    self.statusLabel.text = "Connection Failed"
                    self.button.isSelected = false
                    self.button.isEnabled = false
            }
        }
    }
The Button Tap Handler
The only bit of UI code that should need any explanation is the UIButton tap event handler, the buttonPressed method, shown below:-
    @IBAction func buttonPressed(sender: UIButton) {
        guard session?.status == .connected else {
            self.updateUI(for: self.session?.status ?? .error)
            return
        }
        let state = !sender.isSelected
        sender.isEnabled = false
        completion = {
            sender.isSelected = state
            sender.isEnabled = true
        }
        print("setting state to \(state)")
        publishMessage(state ? "on" : "off", onTopic: "test/message")
    }
The first thing the function does is check the connection state and update the UI if the connection has been lost.
Assuming the session is still active, it toggles the button’s state, but in a non-naive way: the new button state is sent to the MQTT broker via publishMessage(), but the UI state is not changed until the message is delivered. In the meantime, the button is disabled to prevent further taps.
The instance variable completion is assigned to a closure that will be called when the message delivery confirmation arrives, and that’s where the button state is updated.
Publishing MQTT Messages
The method that publishes the MQTT message is very short, just a wrapper:-
    private func publishMessage(_ message: String, onTopic: String) {
        session?.publishData(message.data(using: .utf8, allowLossyConversion: false), onTopic: "test/message", retain: false, qos: .exactlyOnce)
    }
Notice it encodes the message by converting the String into Data using UTF8 encoding.
Quality of Service
You’ll notice the publishMessage() method also specifies a qos (Quality of Service) of .exactlyOnce. There are three QoS settings in MQTT:-
- At Most Once
- At Least Once
- Exactly Once
At Most Once is the lowest quality of service, delivering the message with no acknowledgement. This is useful for sending noncritical data updates.
At Least Once is the next-highest quality of service, which uses an acknowledgement handshake signal. The message is stored by the sender, and re-sent as necessary until it receives the acknowledgement. It’s guaranteed to arrive, but it may arrive multiple times if the acknowledgement path is unreliable.
Exactly Once is the most reliable quality of service, guaranteeing that the message is delivered exactly once. It uses a four-way handshake to implement this guarantee, which has the downside of making this the slowest delivery method.
publishMessage() uses the .exactlyOnce QoS because because it should be certain the recipient has received the message before updating its UI. Depending on what you’re turning on or off, the .atLeastOnce QoS may also be sufficient.
To implement a QoS of .exactlyOnce or .atLeastOnce, you should implement a callback to receive the acknowledgement message:-
    func messageDelivered(_ session: MQTTSession, msgID msgId: UInt16) {
        print("delivered")
        DispatchQueue.main.async {
            self.completion?()
        }
    }
When the acknowledgement is received, the completion closure that was set in buttonPressed() is now called. The closure, if you recall, re-enables the button and updates its state.
Like all iOS UI updates, it has to happen on the main thread, so the completion() call is performed inside a DispatchQueue.main.async { ... } wrapper.
Build & Launch the App
Choose the simulator for your first test. The app should build and run without problems.
Upon launch, the app will show a label saying “Connecting…” and, assuming you have an MQTT server running at the hostname or IP address you specified above, it should quickly change to “Connected”.
Test Using an MQTT Subscriber Device
If you followed the previous tutorial in this series [LINK] then you will have an ESP8266 client configured and ready for the your app to control.
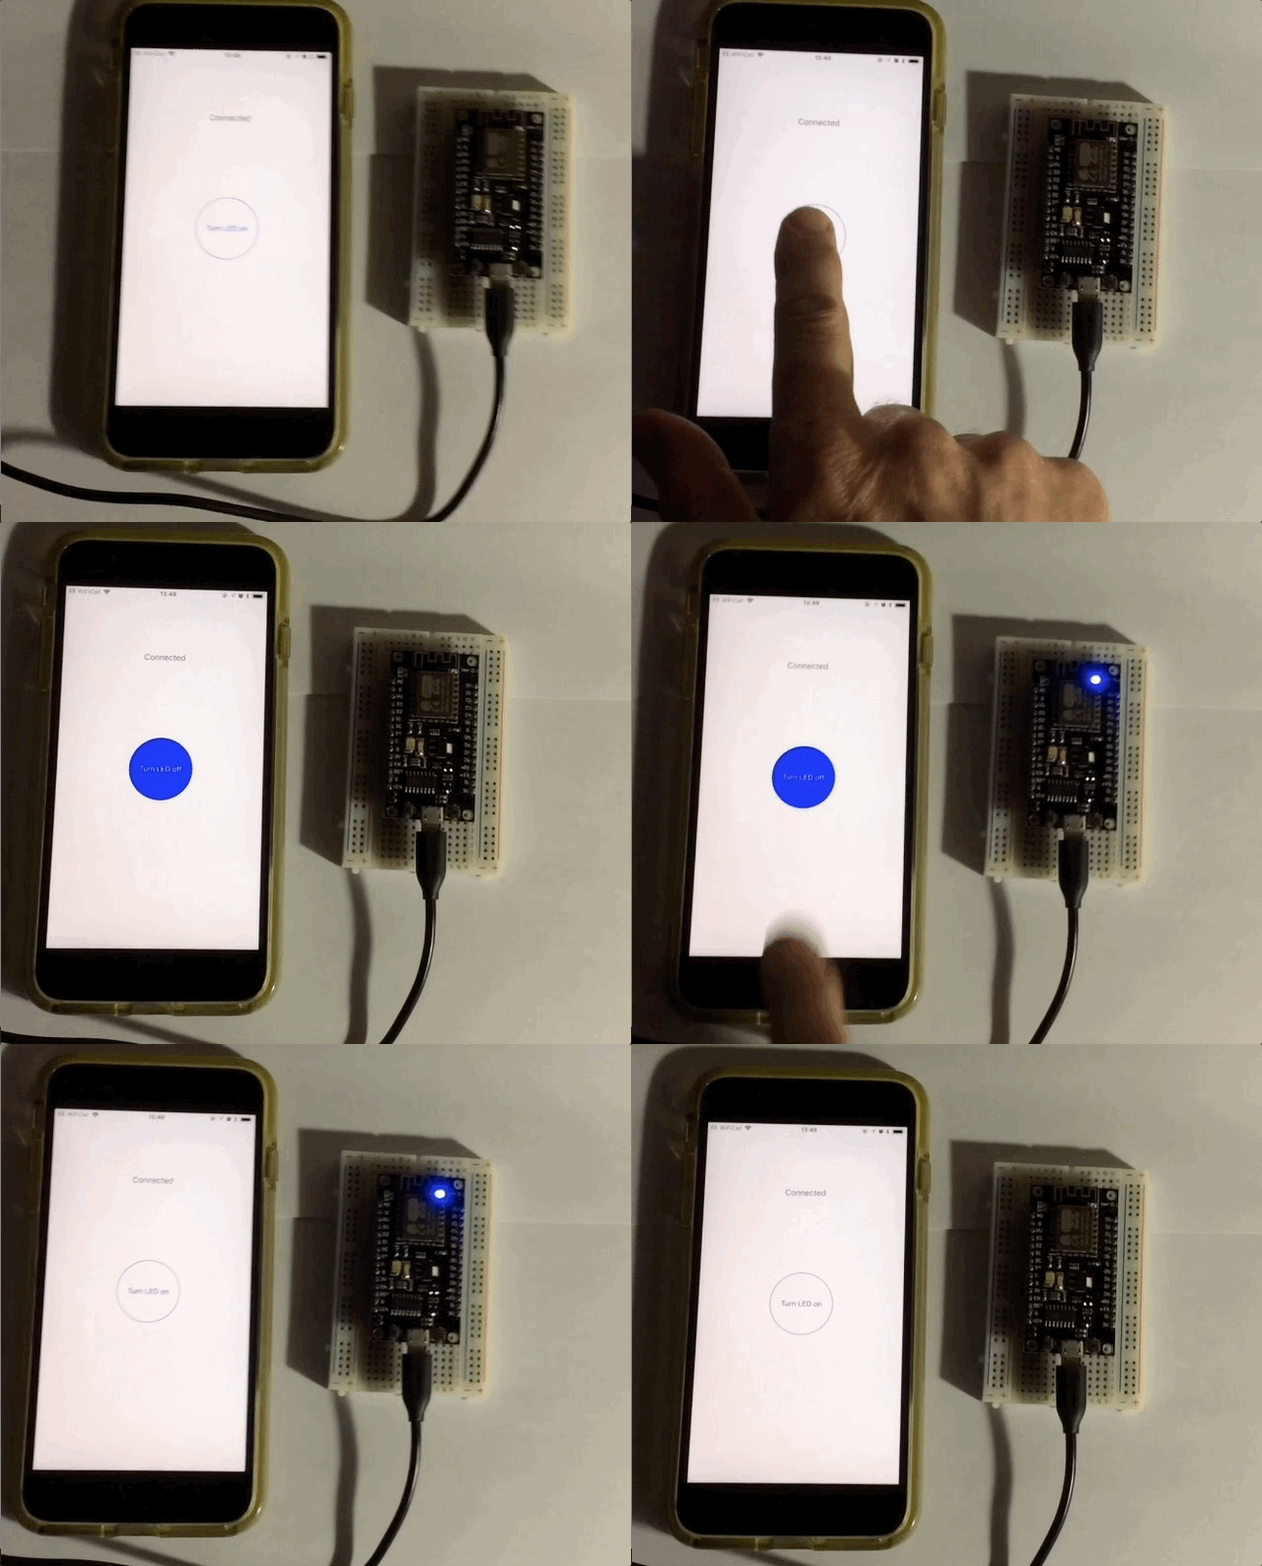
Just connect it to the network, wait for it to issue a “hello” message, and press the “Turn LED on” button. After a short delay while the message propagates through the network, the LED on your ESP8266 should turn on. And if you press “Turn LED off,” it should turn off again.

As a starting point, you can see the possibilities for this are enormous. Going beyond simple on/off functionality, you could control dimmers and RGB lighting, read thermostats and even monitor an entire home with a native iOS app.
Test Using Command Line
If you haven’t got a physical device handy, or if you want to perform more thorough testing, you can still simulate a subscriber on the command line:-
mosquitto_sub -h your-mqtt-server-hostname-or-IP-address -t "test/message"
This will wait for incoming messages on the topic test/message and display them as they arrive. It’s a quick and easy way of testing whether the iOS app is working.
If the app is functioning properly you’ll see the following messages when you press the button in iOS:-
on
off
Conclusion
In this tutorial you’ve learned how to create an MQTT publisher client for iOS using Swift. For the sake of clarity and simplicity, there are several edge cases that I have not covered here, particularly to do with connection stability and error handling.
This tutorial deliberately does not cover receiving MQTT messages in iOS. I wanted to cleanly separate the publisher and subscriber client models. In another article I’ll show you how to build an iOS MQTT subscriber app – subscribe to the email list to hear about it as soon as it’s published.
Thanks for Reading & Get In Touch
Have you made something great with this? I’d love to see your photos and hear your stories. Please send me feedback, either by leaving a comment below or by contacting me directly.
And if you’d like to receive updates about my upcoming projects, please join my mailing list.
You can also follow me on Twitter.


