Creating an IBDesignable Gradient View in Swift 4
This tutorial will demonstrate how to create a versatile, @IBDesignable gradient view class in Swift 4. You can drop the CAGradientView into storyboards and preview at design time, or add it programmatically. You can set the colours for two gradient stops (start and end), and easily set the gradient direction (in degrees), so you can easily have horizontal gradients, vertical gradients, or any angle you like. These properties are completely controllable from the IB inspector.
Why We Need This
Designers just love gradients. Admittedly, like drop shadows, they go in and out of fashion with the changing wind, and they do tend to be more subtle nowadays, but any developer who’s ever sat through a lot of design meetings has probably had a conversation something like this:-
Developer: Whoa… what’s with all these gradients?
Designer: I don’t think the user will consciously see them, but they’ll direct him to the CTA without him feeling manipulated.
Developer: So you want gradients so subtle the user won’t notice them?
Designer: Yes. I mean, not consciously, no. The CEO loves them.
Developer: [Strokes beard.] I dunno. That’s a lot of gradient layers.
Designer: Can’t you just do it in CSS? That’s what the web guys at my last gig did.
Developer: [Sigh…]
If you’ve felt this pain, then this article is for you. Creating a gradient can be fiddly, and tweaking it to look like your designer envisioned it can be time-consuming. This tutorial shows you how to build a gradient view component you can drop into storyboards and preview right from within Interface Builder.
Your designers will love you for it!
What Will We Build?
It’s easy to say were going to build a gradient view, but what are the exact requirements? Let’s define them:-
- It must be a
UIViewsubclass - It must be written in Swift 4
- It must be
@IBDesignableso it can be previewed in Xcode/Interface Builder - It must be completely configurable either in code or in Interface Builder
Two of the most difficult properties to expose in the storyboard attributes inspector panel are the gradient start and end points.
Get the Example Project
For a head start, or if you don’t want to read the whole tutorial, you can grab the example project from GitHub at any time.
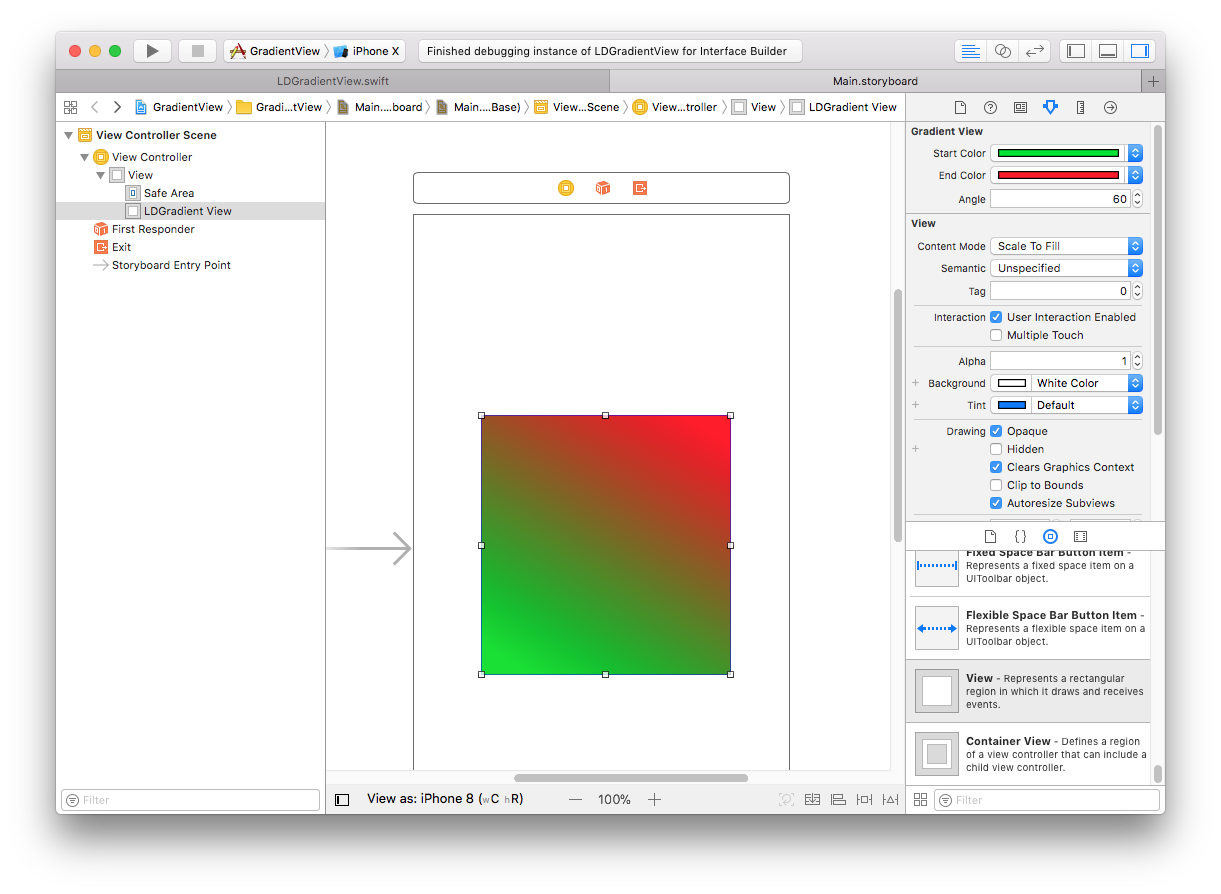
When you load the project into Xcode and open the example ViewController scene in the storyboard, you will be able to select the gradient view and edit it in the Attributes Inspector, as shown in the image below.
About Gradient Layers
NOTE: This is not intended to be an introduction to CAGradientLayer. If you need a more basic introduction, please read our Mastering CAGradientLayer in Swift tutorial which explains all the nitty-gritty details of the code we’re about to write here.
There are several ways to achieve a gradient effect in iOS but in this tutorial we will be using CAGradientLayer. This is a subclass of CALayer, a Core Animation object that is part of the view’s layer hierarchy. In iOS, UIViews are described as layer-backed views because their appearance is controlled by their layer property. Every view has a layer, and just like every UIView can have multiple subviews, every layer can have multiple sublayers.
What this means in practical terms is that each view can have an arbitrarily complex tree of layers to add visual complexity to the view. When working heavily with Core Animation, at some point the developer has to draw the distinction between adding complexity at the CALayer level and simply adding a new UIView to achieve the same effect. Usually the delineation between views and layers is quite obvious, often because some property of a view is required for the functionality of the app (for instance, a UILabel or UIButton is required), but when we create rich UIs with lots of subtle graphics it can become all too easy to increase the complexity of the layer hierarchy. In general, this should be avoided where possible because layers can only be managed in code, not in storyboards, and the logic for managing the layer hierarchy can become quite unwieldy.
For the purposes of this tutorial we will add a single CAGradientLayer as a sublayer on the view’s layer property. This gives a one-to-one mapping between views and layers, and nicely encapsulates each gradient layer inside a UIView so it can be laid out in a storyboard.
Defining the View Subclass
The core of this tutorial is a gradient view called LDGradientView, which is a subclass of UIView and is defined as follows:-
@IBDesignable
class LDGradientView: UIView {

    // ...

}
The class is marked as @IBDesignable which means it can be previewed in Interface Builder (Xcode’s storyboard editor).
The gradient itself is defined as a private property of the class:-
    // the gradient layer
    private var gradient: CAGradientLayer?
This property is created by the function below, which sets the gradient’s frame property to the view’s bounds, thereby taking up the entire view. This is in keeping with the one-to-one mapping between view and layer.
// create gradient layer
    private func createGradient() -> CAGradientLayer {
        let gradient = CAGradientLayer()
        gradient.frame = self.bounds
        return gradient
    }
Then it is added as a subview of the view’s layer as shown:-
    // Create a gradient and install it on the layer
    private func installGradient() {
        // if there's already a gradient installed on the layer, remove it
        if let gradient = self.gradient {
            gradient.removeFromSuperlayer()
        }
        let gradient = createGradient()
        self.layer.addSublayer(gradient)
        self.gradient = gradient
    }
These are both private functions because a view’s layer hierarchy should be its own business.
If you are installing the gradient view in a complex hierarchy, or any superview that uses constraints, then every time the frame is set the view must update itself. You can do that by adding these methods:-
    override var frame: CGRect {
        didSet {
            updateGradient()
        }
    }

    override func layoutSubviews() {
        super.layoutSubviews()
        // this is crucial when constraints are used in superviews
        updateGradient()
    }

    // Update an existing gradient
    private func updateGradient() {
        if let gradient = self.gradient {
            let startColor = self.startColor ?? UIColor.clear
            let endColor = self.endColor ?? UIColor.clear
            gradient.colors = [startColor.cgColor, endColor.cgColor]
            let (start, end) = gradientPointsForAngle(self.angle)
            gradient.startPoint = start
            gradient.endPoint = end
            gradient.frame = self.bounds
        }
    }
Finally, we also need some way of instantiating the view and calling the installGradient function, which we do from one of two initializers, the first to initialize from Interface Builder and the second for programmatic instantiation:-
    // initializers
    required init?(coder aDecoder: NSCoder) {
        super.init(coder: aDecoder)
        installGradient()
    }

    override init(frame: CGRect) {
        super.init(frame: frame)
        installGradient()
    }
Defining a Gradient
Now we have a UIView subclass that can install a CAGradientLayer, but that doesn’t achieve a whole lot. Let’s make the gradient view work for us…
There are two main properties of CAGradientLayer that our custom view will be manipulating. These are:-
- The gradient’s colours
- The gradient’s direction
Defining the Colours
The colours are defined as a property on CAGradientLayer:-
var colors: [Any]?
// An array of CGColorRef objects defining the color of each gradient stop. Animatable.
A Note on Gradient Stops
The points at which the colour changes in a gradient are called gradient stops. Gradients do support fairly complex behaviour, and can have unlimited stops. Programming this behaviour is straightforward. Creating an @IBInspectable interface for it, however, is much more challenging.
It would be relatively trivial to add another gradient stop or two, but solving the general problem of an arbitrary number of stops is more difficult and the solution would likely be less usable than doing the same job directly in code.
For that reason, this project deals only with “simple” gradients: ones that start with a colour at one edge of the view and fade to another colour at the opposite edge.
So our implementation of the colour stops is simply:-
    // the gradient start colour
    @IBInspectable var startColor: UIColor?

    // the gradient end colour
    @IBInspectable var endColor: UIColor?
These are surfaced in Interface Builder as nice colour controls.
Defining the Direction
The gradient’s direction is defined by two properties on CAGradientLayer:-
var endPoint: CGPoint
The end point of the gradient when drawn in the layer’s coordinate space. Animatable.
var startPoint: CGPoint
The start point of the gradient when drawn in the layer’s coordinate space. Animatable.
A gradient’s start and end points are defined in the unit gradient space, which simply means that whatever the dimensions of a given CAGradientLayer, in the unit gradient space we consider the top left to be position (0, 0) and the bottom right to be position (1, 1), as illustrated below.
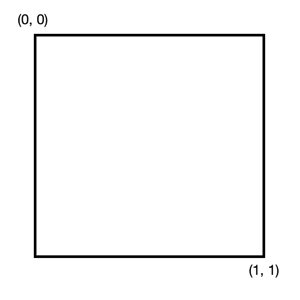
The CAGradientLayer coordinate system
The direction is the most challenging part of making a gradient @IBDesignable. Because of the need for a start and end point, the fact that @IBInspectable attributes don’t support the CGPoint data type, not to mention the complete lack of data validation in the UI, our options are a bit limited.
When trying to work out the simplest way to define common gradient directions, a string seemed a potentially useful data type and it seemed that compass points, e.g. “N”, “S”, “E”, “W” might be useful. But for intermediate directions should we support “NW”? What about “NNW” or “WNW”? And beyond that? That would immediately get confusing. And this way of thinking was clearly a long way round to realising that the best way to describe any angle on the compass was using degrees!
The user can forget about unit gradient spaces and all the complexity is reduced to a single property exposed to Interface Builder:-
    // the gradient angle, in degrees anticlockwise from 0 (east/right)
    @IBInspectable var angle: CGFloat = 270
Its default value (270 degrees) points south simply to match the CAGradientLayer default direction. For a horizontal gradient, set it to 0 or 180.
Converting the Angle to Gradient Space
This is the hardest bit. I’m including the code and a description of how it works, but of course you can skip this if you’re just interested in using the class.
The top-level function to convert the angle to start and end points gradient space looks like this:-
    // create vector pointing in direction of angle
    private func gradientPointsForAngle(_ angle: CGFloat) -> (CGPoint, CGPoint) {
        // get vector start and end points
        let end = pointForAngle(angle)
        let start = oppositePoint(end)
        // convert to gradient space
        let p0 = transformToGradientSpace(start)
        let p1 = transformToGradientSpace(end)
        return (p0, p1)
    }
This simply takes the angle that the user specified and uses it to create a vector pointing in that direction, as illustrated below. The angle specifies the rotation of the vector from 0 degrees, which by convention points east in Core Animation, and increases anti-clockwise (counter-clockwise).
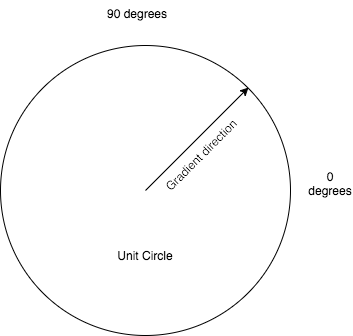
The end point is found by calling pointForAngle(), defined thus:-
    private func pointForAngle(_ angle: CGFloat) -> CGPoint {
        // convert degrees to radians
        let radians = angle * .pi / 180.0
        var x = cos(radians)
        var y = sin(radians)
        // (x,y) is in terms unit circle. Extrapolate to unit square to get full vector length
        if (fabs(x) > fabs(y)) {
            // extrapolate x to unit length
            x = x > 0 ? 1 : -1
            y = x * tan(radians)
        } else {
            // extrapolate y to unit length
            y = y > 0 ? 1 : -1
            x = y / tan(radians)
        }
        return CGPoint(x: x, y: y)
    }
This function looks more complicated than it is: at its core is simply takes the sine and cosine of the angle to determine the end point on a unit circle. Because Swift’s trigonometry functions (in common with most other languages) require angles to be specified in radians rather than degrees, then we have to do that conversion first. Then the x value is calculated by x = cos(radians), and the y value by y = sin(radians).
The rest of the function is concerned with the fact that the resulting point is on the unit circle. The points we need, however, are in a unit square. Angles along the compass points (i.e. 0, 90, 180 and 270 degrees) will yield the correct result, at the edge of the square, but for intermediate angles the point will be inset from the edge of the square, so the vector must be extrapolated to the edge of the square to give the correct visual appearance. This is illustrated below.
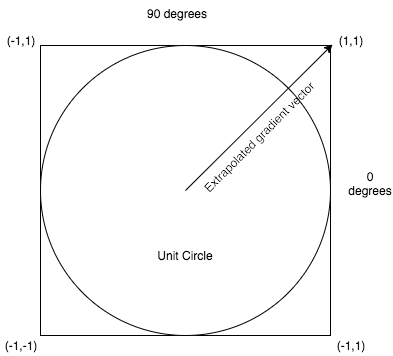
Now we have the end point in a signed unit square, the start point of the vector is found by the simple function below. Because the point is in a signed unit space, it is trivial to find the start point by simply reversing the sign of the components of the end point.
    private func oppositePoint(_ point: CGPoint) -> CGPoint {
        return CGPoint(x: -point.x, y: -point.y)
    }
Note that another way to achieve this would have been to add 180 degrees to the original angle and call pointForAngle() again, but the sign reversal method is so simple that it is slightly more efficient to do it that way.
Now we have have the start and end points in the signed unit space, all that remains is to translate them to the unsigned gradient space. Note that the signed space has a y axis that increases northwards, where as in the Core Animation space y increases southwards, so the y component must be flipped as part of this translation. The location (0, 0) in our signed unit space becomes (0.5, 0.5) in the gradient space. The function is very straightforward:-
    private func transformToGradientSpace(_ point: CGPoint) -> CGPoint {
        // input point is in signed unit space: (-1,-1) to (1,1)
        // convert to gradient space: (0,0) to (1,1), with flipped Y axis
        return CGPoint(x: (point.x + 1) * 0.5, y: 1.0 - (point.y + 1) * 0.5)
    }
Phew!
And that is all the hard work done – phew! Congratulations for getting this far – go get yourself a coffee to celebrate…
Interface Builder Support
All that remains of the gradient view class is the prepareForInterfaceBuilder() function. This function is only run from with Interface Builder when it needs to render a view. A properly-designed @IBDesignable view can actually work quite well without it, but there will be times – for instance when adding a new view to a storyboard – when it will not render properly until this function is present. You can force it to run by selecting the view in the storyboard and choosing Editor|Debug Selected Views from the menu.
Our implementation of the function simply makes sure the gradient is installed and updated.
    override func prepareForInterfaceBuilder() {
        super.prepareForInterfaceBuilder()
        installGradient()
        updateGradient()
    }



Hello, for some reason this code doesn’t cover the whole UIView for me. I’m doing the following:
– Adding a UIView in the .storyboard to the ViewController.
– UIView – Aspect Fill, adding constrains to 0 for left, right, top, bottom, aligning it horizontally in container.
– In Custom class for UIView, I’m adding LDGradientView, so that I can change the Gradient View variables in the Attributes Inspector.
It all looks perfect in the .storyboard, but when I test on the device, the ‘gradient rectangle’ is smaller than the device area, if it’s iPad.
I fact, it seems that the ‘gradient rectangle’ has some fixed size that I can’t control.
Hi Anton,
Thanks very much for your question. I realise I have changed the code slightly since first publishing this article. The problem you’re seeing is because layoutSubviews and/or setFrame are not overridden in the LDGradientView class. That can be fixed by adding the following code to the class:-
Hope this helps! I have updated the article to include these changes also.
Regards,
Lee
Hi, I have the same problem as Anton, added the updated override code but it does not seem to help
Hi Kiprop,
Thanks for the feedback! Sorry to hear that you’re having trouble.
It may be something to do with your view and constraints layout. Sometimes, for complex constraints,
layoutSubviews()gets called too early, before the constraints have fully resolved. Normally in this case you’d see the frame set to some suspicious dimensions like a square 600×600 or something. This means the constraints are coming from the storyboard default value.If you set a breakpoint in layoutSubviews(), does it it get hit multiple times? If it does then the constraints are still being calculated and you have to do something hackish to determine when the frame is finally correct.
I have an answer on StackOverflow that addresses this problem.
Let me know if that helps or not.
Hmm iѕ anyone else having problеmѕ with the images on this blog loading?
I’m trying to determine if its a problеm on my end or
if it’s the blog. Any feed-back would be greatly aρpreciated.
Hi, I’ve not heard of anyone else having any trouble. Are you still seeing problems?