How to Backup & Clone a Raspberry Pi SD Card on macOS the Easy Way

Do you struggle to remember how to backup a Raspberry Pi SD card on your Mac? Have you ever found it difficult to identify the physical device on the command line? Do you find online tutorials gloss over important details, or are just plain wrong?
This tutorial will explain everything step-by-step, easily and safely.
There are plenty of reasons for wanting to backup and clone your Raspberry Pi SD card. Maybe you’re worried about a tiny micro SD card getting damaged or corrupted, or just lost. Perhaps you need to clone a working installation so you can use it in your new Raspberry Pi 3 or Raspberry Pi Zero W. Or perhaps your Raspbian configuration is now just so slick that you just want to clone it for all your new projects.
It should be easy, but the problem is many online tutorials are now out of date, over-simplified or just plain wrong.
At the time of writing, if you type “raspberry pi sd card backup mac” into Google, the number one result is a Medium article that starts out by admitting it doesn’t even do what the title says!
Making an exact backup of your Raspberry Pi SD card is just not as straightforward as it should be. Utilities exist that make it easier in Windows, but on the Mac most people use the command line. For the most part that’s just fine. But the hardest part about doing it on the command line is correctly identifying the SD card, which is precisely the part many tutorials gloss over.
This tutorial will explain everything step-by-step.
Plug the Existing SD Card Into the Mac
If you have an older Macbook Pro or a Mac Mini with an SD card slot you’re in luck; otherwise you’ll need some kind of dongle that lets you read/write SD cards via USB. (Apparently an SD card slot was too big and cumbersome for the new models.) And if you have one of the latest Macbooks then you might need multiple dongles because of the gross stupidity that is USB-C. You can blame Apple for that one. Rant over.
On the newer Raspberry Pi 3 Model B and A+ and Pi Zero models, you’ll also be dealing with microSD cards, so you may also need an adapter to allow it to fit into a full-size SD slot.
You can pick up a twin-pack of suitable 32GB class 10 microSD cards here, or even this 5-pack of Samsung 32GB EVO Plus Class 10 Micro SDHC with Adapter
.
Once you have all the adapters and dongles you need, you can plug the SD card you want to backup into your Mac, you’re good to go…
Identify the Physical SD Card in macOS
This is harder than it should be. The reason is that most Raspberry Pi users run a variant of Linux, and the Linux file system is not recognised by macOS (or indeed Windows).
At this point, many guides send you straight to the command line to identify your SD card. The reasoning is probably that Raspberry Pi users are not scared of hacking about on the command line.
But it’s different when you’re using potentially dangerous commands like sudo dd on your Mac. You actually can cause damage, way beyond the confines of your Raspberry Pi. And over recent years both the macOS file system and Raspberry Pi installations have become more complex, resulting in a large number of logical drives that can confuse even experienced users.
Luckily there’s an easier (and safer) way.
Using Disk Utility
First open Disk Utility on the mac. It’s unlikely to be in your Dock, so press cmd+space to launch Spotlight and type “disk” and it should appear. Launch it and you should see something like this:-
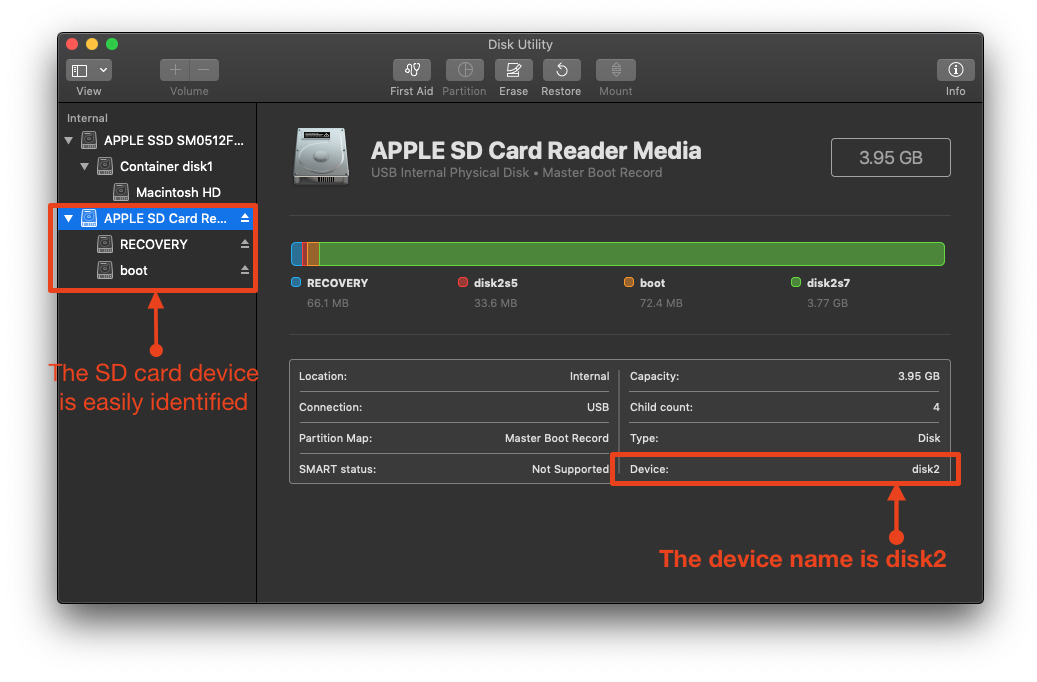
In the left pane you’ll see a list of devices. On macOS Mojave you should see a device called “APPLE SD Card Reader Media”, which makes identifying the SD card about as easy as it can be. Click on the “APPLE SD Card Reader Media” device and look in the main window for the Device name. In the example above it’s disk2.
On older versions of macOS, and maybe different hardware, you might not see the helpful “APPLE SD Card Reader Media” device. Depending on the way your SD card was created, you could see some “devices” (actually logical volumes) called “boot” and possibly “RECOVERY”. If you don’t see either of those, you might just see something like “disk2s1”.
There are a couple of clues you can use to identify which device is your SD card. Some tutorials tell you to use the card’s capacity as a clue, but unfortunately as SD cards get bigger (256 GB is now common, and even 512GB is now available), this is becoming an increasingly unreliable way of checking.
Below are some screenshots of various logical volumes you might see in Disk Utility, with the SD card identified.
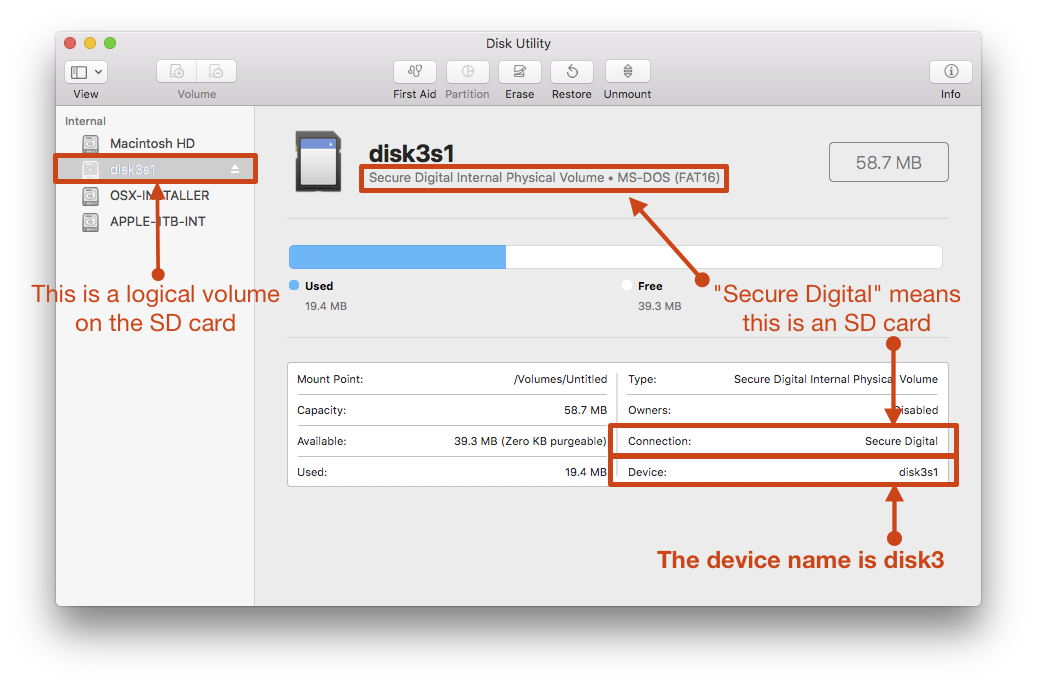

There’s a lot of useful information in the main panel of Disk Utility:-
- if the Connection field says “Secure Digital” you can be sure it’s an SD card
- if Connection says “USB” and you have no other USB drives plugged in, then it’s likely an SD card also.
You can also use negative clues:-
- if Connection says “PCI” then it is a hard drive, not an SD card
- likewise, if it says “SATA” then it is one of your hard drives and not an SD card.
Using these clues you be able identify the device name.
Physical vs. Logical Device Names
Depending on exactly how you managed to identify your device, you will have a device name in the format:-
diskN
or
diskNsM
For example, it could be:-
disk3
which is a physical device, or
disk3s1
which is a logical device (volume).
You don’t need to worry too much about what this means, only that the physical device means the physical SD card and the logical devices are the file systems stored on it. For what you’re doing, all that matters is the physical device name, so ignore the s and any numbers after it.
So if your device name is something like disk3, you’re good to go. If it’s something like disk2s1 then the physical device is disk2.
Fire Up the Terminal!
OK, you’ve delayed it for long enough. Time to crack open the Terminal…
You can find Terminal by opening Spotlight and typing the first few letters or “Terminal”.
Launch it and type:-
diskutil list
Now you’ll get a list of all the physical and logical devices. It will look something like this:-
/dev/disk0 (internal, physical):
   #:                       TYPE NAME                    SIZE       IDENTIFIER
   0:      GUID_partition_scheme                        *500.3 GB   disk0
   1:                        EFI EFI                     209.7 MB   disk0s1
   2:                 Apple_APFS Container disk1         500.1 GB   disk0s2

/dev/disk1 (synthesized):
   #:                       TYPE NAME                    SIZE       IDENTIFIER
   0:      APFS Container Scheme -                      +500.1 GB   disk1
                                 Physical Store disk0s2
   1:                APFS Volume Macintosh HD            362.4 GB   disk1s1
   2:                APFS Volume Preboot                 44.7 MB    disk1s2
   3:                APFS Volume Recovery                512.4 MB   disk1s3
   4:                APFS Volume VM                      3.2 GB     disk1s4

/dev/disk2 (internal, physical):
   #:                       TYPE NAME                    SIZE       IDENTIFIER
   0:     FDisk_partition_scheme                        *4.0 GB     disk2
   1:             Windows_FAT_16 RECOVERY                66.1 MB    disk2s1
   2:                      Linux                         33.6 MB    disk2s5
   3:             Windows_FAT_32 boot                    72.4 MB    disk2s6
   4:                      Linux                         3.8 GB     disk2s7
The parts I’ve highlighted in green are the important bits of information, which are:-
- Under the IDENTIFIER column, you should see the physical device you identified above. In the example above it’s
disk2. - On the left-hand side you can see the Unix device identifier, in this case
/dev/disk2. Make a note of it; you’ll need it soon. - the last entry in the
/dev/disk2section of the list: it should be listed with a TYPE ofLinuxand its SIZE should be most of the capacity of the SD card.
Running diskutil is basically a sanity check. You want to double check that the device name you identified above appears in the list, and that that size matches your SD card’s capacity.
You need to ensure the Linux volume is present on the physical device., because it is the Linux file system that is used by the Raspberry Pi. It contains the entire OS and all your files. The capacity listed next to it does not reflect how much of it is used, because macOS cannot read the file system. diskutil simply shows that size of the entire volume on the SD card.
If you’re wondering about the Windows_FAT_16/32 entries, they are special volumes created by the NOOBS installer, and not used by the Raspberry Pi. These sometimes show up as logical devices in Disk Utility, since macOS can read FAT file systems.
Copy the SD Card Contents
Now you have enough information to copy the card to your local hard drive. Before you start, make sure you have enough free space on your hard drive: you’ll need at least the size of your SD card spare, and realistically a few GB more for margin.
Create a directory to store your data, and navigate into it:-
cd ~
mkdir rpi_backups
cd rpi_backups
Copy Using the dd Command
Now you’re ready to copy the card. You’ll use the dd command, which I’ve always assumed stands for “data dump” or “disk dump”, although its actual origins are shrouded in internet mythology.
Regardless of the actual meaning of the name, many people jokingly refer to dd as “disk destroyer” because of what happens when you make a mistake. This is one of the reasons you need to be so careful in identifying the correct device name for the SD card.
In this first command, though, you’re only copying from the SD card to a local file, so there’s no much scope for anything to go too wrong. Because dd needs access to the raw SD card hardware, you need to run it as root, so you must put sudo before the command. This is the general form of the copy command:-
sudo dd if=/dev/rdiskN of=output-filename.dmg
So if your SD card is disk2 and you want to output to a file called raspberry_pi_backup.dmg then you’d use this command:-
# THIS IS AN EXAMPLE ONLY! DO NOT BLINDLY COPY THIS WITHOUT READING THE TEXT!
sudo dd if=/dev/rdisk2 of=raspberry_pi_backup.dmg
There will be no output for a long time. The exact time is unpredictable. It could be anything from 10 minutes to over an hour, depending on the speed and size of your SD card plus your system. When it’s finished you should see a message saying how many bytes were transferred.
Saving Disk Space With a Compressed Backup
If you’re copying a large SD card and disk space is an issue, you can compress as you copy, using the general form:-
sudo dd if=/dev/rdiskN | gzip >output-filename.gz
This redirects the output of dd into the gzip command and pipes the output of that into output-filename.
Following the example above, this would be:-
# THIS IS AN EXAMPLE ONLY! DO NOT BLINDLY COPY WITHOUT READING THE TEXT!
sudo dd if=/dev/rdisk2 | gzip >raspberry_pi_backup.gz
Restoring the Backup Onto Another SD Card
Of course there’s no point making a backup if you can’t restore from it. Sooner or later you’re going to want to copy one of the backups you’ve so diligently made back to an SD card.
Be aware before you start, this process will probably take several hours to complete. If you’re thinking of doing this as shortcut to making copies of a brand new, clean installation, consider that it will generally be quicker to install from scratch using NOOBS.
But if you’re restoring a backup or making a copy of a valuable configuration, this is the method to use.
What Size Card Do You Need?
To copy to a new SD card, choose a card that’s at least as big as the original one you backed up. It can be bigger, but please note that you will not always be able to use the additional space, especially if you installed using NOOBS, so the additional space may be wasted.
You do not need to format the new card, since dd overwrites everything, including the format information.
Identify the New Card
First you need to identify the new card’s device name. Plug in the new card and run:-
diskutil list
Normally the new SD card will appear with exactly the same physical device name as the one you copied from. But you’re about to use dd (aka “disk destroyer”, remember?), so please double-check everything here.
You might want to re-run Disk Utility from Spotlight again and just ensure you have the correct device name for the SD card.
Unmount the SD Card Device
Once you’re 100% sure you have the correct device name, you first need to unmount the SD card from the system. This might seem counter-intuitive, but it’s exactly what you need here, because macOS does not understand the Linux file system stored in the SD card backup file.
Unmount the card using:-
diskutil unmountDisk diskN
Where /dev/diskN is the device name.of the SD card you’re writing to.
Unmounting is a bit like ejecting a storage device from the operating system while keeping it physically connected. Basically, because the OS is no longer aware of the device’s file systems, just the physical device, it can now overwrite the storage in any way it wants.
Writing the Data to the New Card
Now you can write your backup image to the SD card using a command like:-
sudo dd if=backup-filename.dmg of=/dev/rdiskN
For example, using the example above, if your physical SD card was disk2, you’d run:-
# THIS IS AN EXAMPLE ONLY! DO *NOT* BLINDLY COPY THIS WITHOUT READING THE TEXT!
diskutil unmountDisk /dev/disk2
sudo dd if=raspberry_pi_backup.dmg of=/dev/rdisk2
dd is far slower when writing than when reading, typically less than 1MB/sec. If the dd command for copying from your SD card to local disk took 10-20 minutes, expect the write to take an hour or two. Whatever you do, don’t sit around waiting for it to finish. Go and do something else, or leave it overnight.
When it’s finally done, it’s safest to eject the device properly:-
diskutil eject diskN
Ejecting is like unmounting but it completely disconnects the physical media from the system and you have to re-insert the device in order to be able to use it again.
Thank you!
Thanks for reading this post, I hope it was helpful.
Have you had any problems copying, backing up or cloning SD cards for the Raspberry Pi?
If you have, or if you just want to leave feedback about the article, please leave a comment below or contact me directly. You can also join my mailing list – see the sidebar. I’d love to hear from you!


Just want to say, great tutorial. Ran into problems where the image I made off a 32gb sd card is ever so slightly larger than that of the sd card that I bought to copy it on to. (like 32.01gb vs 31.91 gb type thing)
Is there anyway of cramming that image on to the new card, is it just dumb luck exactly how much space is on a card, should I just get a 64 gb card thats for sure larger to copy on to… how do I reach the finish line here?
Hi Jim, that is bad luck! Unfortunately, `dd` copies an exact image of the card, it can’t be compressed if you want to use it as a bootable disk image.
And something people don’t often realise about SD cards is that they’re heavily formatted to remove unreliable areas of memory, in much the same way magnetic media was. Cheaper cards generally have more bad blocks so their capacity is smaller than it claims to be (sometimes a lot smaller). For that reason it’s a good idea not to fill the cards too close to capacity if you intend copying them.
Hi Lee, thanks for this tutorial.
I followed all steps on backing up/cloning the SD card and then tried restoring to a new card (same brand, size, class, etc) however it tries to boot and then I get a kernel panic. I’ve tried with 2 different cards actually and same outcome. Any idea what’s wrong here? Did I lose my image?
Hi Tony,
Sorry to hear that, and thanks for the feedback.
The most obvious thing I can think is that you’re trying to boot the new card on different
Raspberry Pi hardware to the original card? That could easily cause a panic.
If that’s not the case, it sounds like your original copy operation went wrong. Can you triple-check you copied from the correct `/dev/rdisk` number?
Also, if you’re doing a compressed copy, there’s an outside chance the compression/extraction went wrong, so try again with no compression.
As a last resort, you could try using the `bs` option during copy and restore. I avoided it deliberately in the tutorial because it generally causes problems, but maybe your SD cards are fussy. Try using `bs=1m` in both the `dd` operations.
Please let me know how you get on!
Hi,
thanks for the reply. So my sdcard is disk2…. do I copy rdisk2 or just disk2 when I use the dd command? You don’t make it very clear in your post as you are using different examples.
Also, does disk2 have to be unmounted before the copy begins?
What is the difference between copying just /dev/disk2 vs /dev/rdisk2?
Thanks again for your help.
Under the IDENTIFIER column, you should see the physical device you identified above. In the example above it’s disk2.
On the left-hand side you can see the Unix device identifier, in this case /dev/disk2. Make a note of it; you’ll need it soon.
the last entry in the /dev/disk2 section of the list: it should be listed with a TYPE of Linux and its SIZE should be most of the capacity of the SD card.
Hi again Tony,
Thanks for pointing out that I don’t explain the difference between `disk` and `rdisk` in the article. I will update the article to make it more clear. The `rdisk` form uses a much faster, lower-level driver, so you should notice a major speed improvement when using `dd`.
So in your case, you can actually copy from either `/dev/disk2` or `/dev/rdisk2`. I’d always recommend `rdisk`, but the only difference is speed.
Regarding your other question, you should not unmount the SD card when copying from it, only when copying to it.
Hope this helps.
I think you’ll find that if you add the bs (bytes) option to dd it can dramatically improve read and write speeds. I used the following command:
sudo dd bs=32m if=/dev/rdiskN of=output-filename.dmg
and went from about 300kB/sec to 72mB/sec – wrote a 32GB image to a new SD card in a few minutes. Speed gains will probably be dependant on card reader and speed of cards.
Hi Robert,
Thanks for the feedback!
You’re right, using the option `bs` can make it faster, but it can also cause problems in my experience – it depends on the quality of the SD card. It’s something I’ve been meaning to document with some actual tests.
Best regards,
Lee